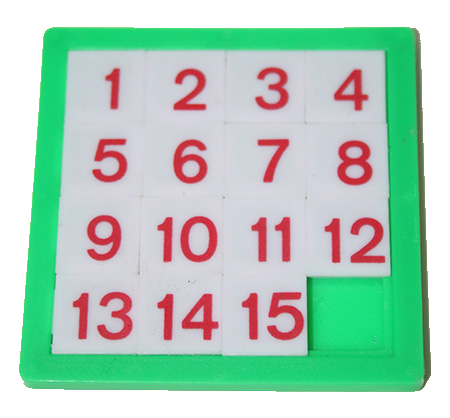
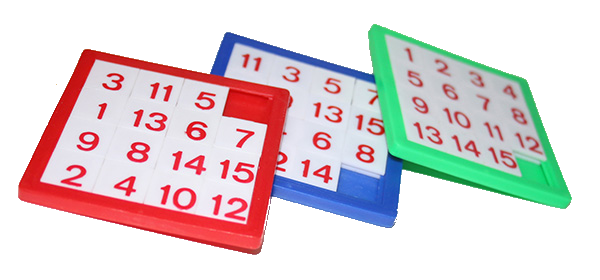
The classic 15-puzzle game consists of a 4×4 board where you have 15 pieces numbered from 1 to 15.You can slide pieces horizontally or vertically to occupy the empty place
The game has been around since the 1800’s and the most common forms are the 3×3 and the 4×4 sizes with pieces numbered from 1 to 8 and 1 to 15 respectively.
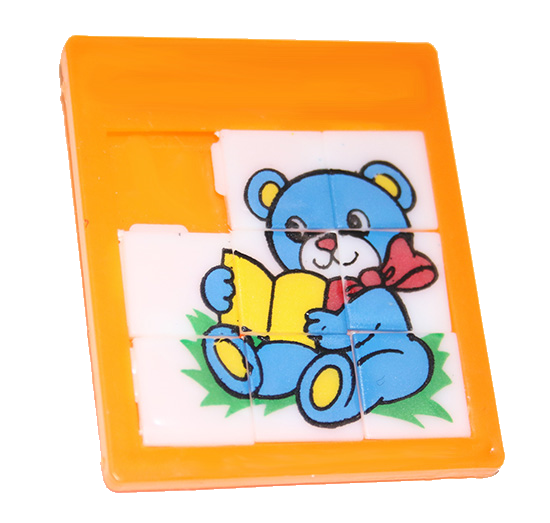
You can find also some puzzles with pictures where you have to slide the pieces and reconstruct a certain image.
Introduction
In this tutorial we will create the 4×4 classic puzzle with pieces numbered from 1 to 15.
The game consists of 2 stages:
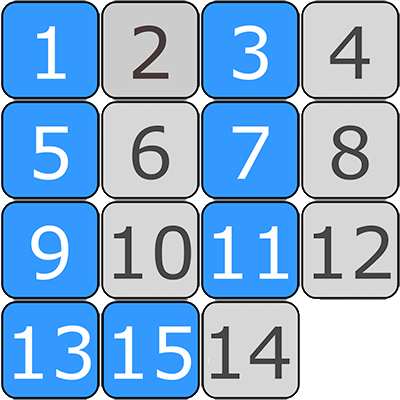
1- Shuffling the numbers where you move from figure 1 to something like:
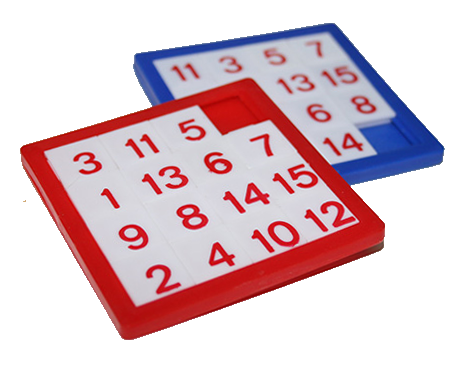
- You would ask a friend to shuffle the pieces – we will leave that task to the computer in our game.
2- Solving the puzzle where you have to slide the pieces and return to the original state (green puzzle figure)
Assets
Make sure before starting to download the 15_puzzle_Assets file that contains all the necessary graphics and sound effect files used in this tutorials. However; feel free to change and replace whatever file you want with your own creations.
Read the below information about the different assets or use is as a guide to introduce your changes.
- The 15 pieces used in the game, referred to in the game as GameParts, numbered from 01 to 15 – these are PNG graphic files with 100×100 pixel dimension and resolution 72dpi.
- 2 sound effect files
- NewAchievement1.wav (Played when you finish the game or restart a new one)
- Sword Swing.wav (Played when you move a pieces)
- Restart button picture (Start.png with dimension 109×40 pixels)
- Title Graphics (15Puzzle.png with dimension 164×40 pixels)
- Bar.png (400×3 pixels black bar used as a separator.
Note: the 2 sound effect files are part of the assets available for free at the Scirra site.
Start construct 2
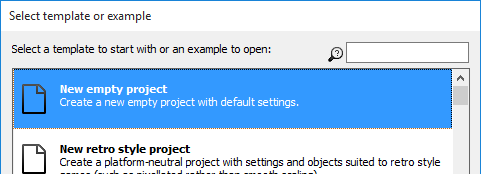
Select File menu → select New
From the list select New Empty Project
Once the project is started in the project tab rename the three sections as follows:
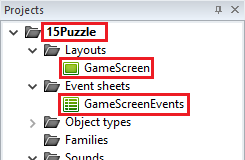
rename the project: 15Puzzle
rename the Layout: GameScreen
rename the Event: GameScreenEvents
Set the size of the Project properties and the GameScreen layout to width: 450 and height:550 pixels
Click on the project name 15Puzzle and change the width and height as follows:

Click on the GameScreen Layout and change the sizes also to 450×550

Import the needed Assets
We need to insert 4 sprites by clicking anywhere on the Layout and selecting the Insert new object option – then selecting the load to choose the images from the assets folder.
| Name of Sprite | Image name | Approximate position | Special Action |
| Title | 15Puzzle.png | Y=22 | Right click on the image select Align→Layout→Center Horizontal |
| Separator | Bar.png | Y=480 | Right click on the image select Align→Layout→Center Horizontal |
| Restart | Restart.png | X=345, y=505 | |
| GameParts | 01.png | Found in the 100×100 folder |
The GameParts sprite requires additional work – we need to import the additional frames.
Double click on the GameParts sprite. Select the Animation frames windows and right click and select Import frames→ From files…
Go to the 100×100 folder in the assets folder and select 02.png to 15.png and click open.
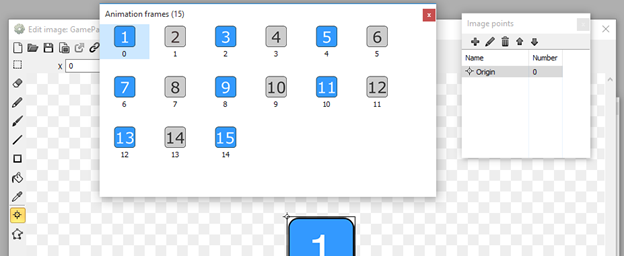
Make sure that in the animation frames you have frames 0 to 14 and the images are in the correct order from 1 to 15.
One more thing left to do here – In the Image points window right click on Origin and select Quick Assign → Top-Left.
Then right click again on the Origin and select Apply to whole animation.
This will ensure that the origin is set to the upper left corner for all frames.
Close the Edit image: GameParts window.
In the Projects – right click on the Sounds and select Import Sounds and select the new files NewAchievement1.wav and Sword Swing.wav
Click Import on the Import audio files window and then click OK to finalize the import.
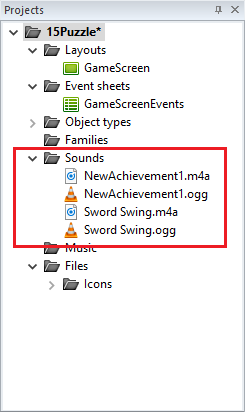
We Need to add 4 text fields – in each case right click on the layout – select Insert new object then in the General section select the Text object – as shown in the figure.

| Name of text field | Purpose | Font, Size and Color | Position | Size |
| ClickCount | Label with text: Click Count | Arial, Size:12, Color: Black | X=29, y=499 | Width=100, Height=22 |
| instructionText | Label with text: Click/Tap the pieces next to the empty place until you arrange all tiles in order |
Arial, Size:8, Color: Black | x=36, y=530 | Width=386, Height=17 |
| txtCount | Initial text: 0 purpose to count the number of clicks in the game |
Arial, Size: 10, Color:Red | X=127, y=500 | Width=41, Height=23 |
It is a good idea to talk a little bit about layers.
Next to the project tab there is a tab called Layers. Select it. It should have one entry in it called Layer 0.
Right click on it and select Rename – Name it Game
Click on the + sign and add another layer – name this layer TopLayer
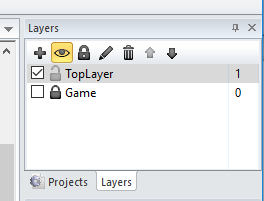
We want to add the text ‘You Win!!!’ to the TopLayer to insure that it is in front of everything.
Lock the Game layer and make it invisible then select the TopLayer and insert the last text on that layer.
| Name of text field | Purpose | Font, Size and Color | Position | Size |
| txtYouWin | To display the text, You Win!!! when the pieces are arranged | Arial, Size: 58, Color: red | X=24, y=210 Make sure that this text is added on the TopLayer. | Width=402, Height=135 |
When you finish this you should end up with something similar to the below:
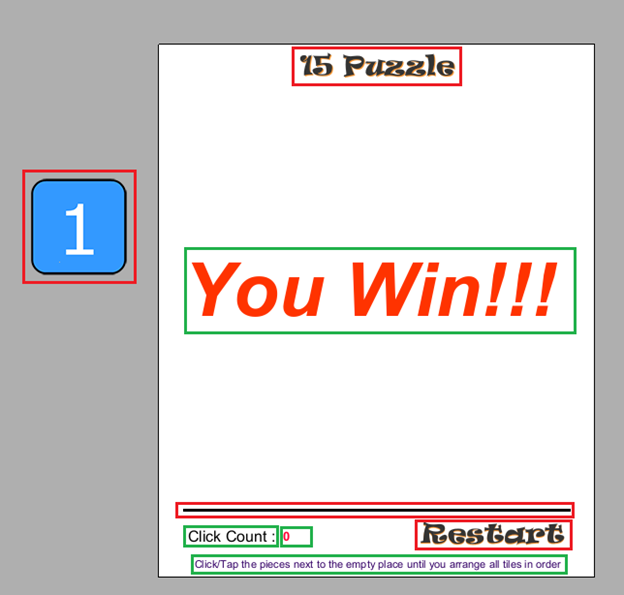
All inserted images are highlighted with red and all the inserted text elements are highlighted with green.
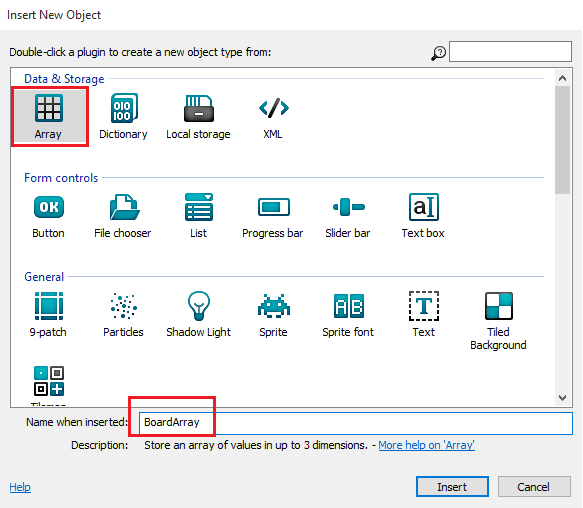
Right click anywhere on the Layout screen and select Insert New Object – and select array and name it BoardArray
This concludes our work in the Layout view – now we move to the Events to bring all these elements to life.
The outline of our work is as follows – all these will be done in the event sheet.
| 1- Set the game board | |
| a- Create the Array and some variable definitions. | |
| b- Initialize the array. | |
| c- Display the pieces. | |
| d- Shuffle the array. | |
| 2- Allowing the user to play the game. | |
| a- Allow the user to move the piece to the empty place if the piece clicked is horizontally or vertically next to the empty place. |
|
| b- Check if it is game over. | |
In our final version we should have shuffle the array before display the pieces – We are doing it here before just to check our work in section (1.b) Initialize the array.
1 – Set the game board
a- Create the Array and some variable definitions
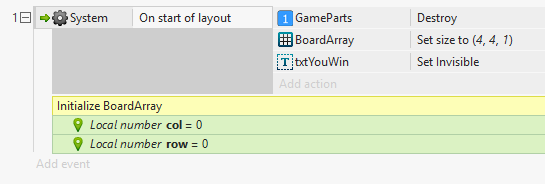
In this first section all work is going to be in the On start of layout event.
Click on Add event button in the event sheet.
Select System → Click next and select On Start of Layout.
Our screen should look like:

Next click on the Add action next to the On Start of layout and select the GameParts then Next and select the Destory form the list of actions.
We are destroying the existing GameParts to ensure that we have a clean start (both for the first time we play and whenever we click the restart button).
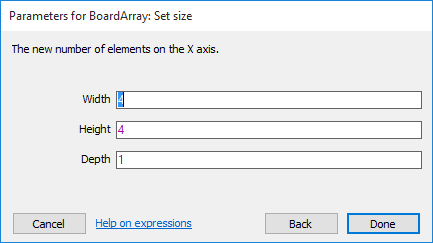
Click on Add action again and select the BoardArray then click next select the Set size action and specify 4 for the X and Y fields and 1 for the Z field.
Click done
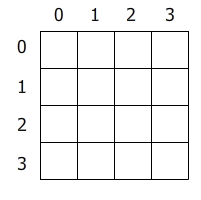
This will create an array of 4×4 dimensions where the index for smallest column is 0 and the index for the largest column is 3.
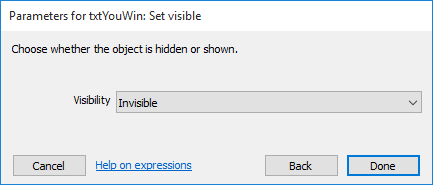
Next we want to make sure that the text “You Win!!!” is not visible.
Click Add action → Select the txtYouWin – then select Set Visible and assign the value Invisible.
Click Done
The first part of the On start of layout should look like this:

b- Initialize the array.
It is very important to start from a correctly ordered array prior to Shuffling it. We can’t put the pieces in random because we might end up with a combination which can never be solved.
In the 1880s when the 15puzzle was lunched the first time it was distributed like this.
Notice that all the pieces are in order except the last 2 (15 and 14) – This combination is unsolvable.
Explanation of Valid orders can be found here
Title: 15 Puzzle – Solution
We need to initialize the array as follows:
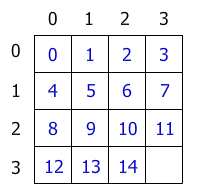
The empty place in the array (3,3) will be indicated by -1.
We need a loop that counts from 0 to 14 (indicated by the variable i) and formulas to determine the row and column based on the index of the loop.
Row = int( i / 4) → this is the integer part of dividing the index by 4
Col = i % 4 → this is the remainder of dividing the index by 4
The complete possibilities are given by this table
| i | row | col |
| 0 | 0 | 0 |
| 1 | 0 | 1 |
| 2 | 0 | 2 |
| 3 | 0 | 3 |
| 4 | 1 | 0 |
| 5 | 1 | 1 |
| 6 | 1 | 2 |
| 7 | 1 | 3 |
| 8 | 2 | 0 |
| 9 | 2 | 1 |
| 10 | 2 | 2 |
| 11 | 2 | 3 |
| 12 | 3 | 0 |
| 13 | 3 | 1 |
| 14 | 3 | 2 |
In the GameScreenEvents sheet right click anywhere and add a comment.
Name the comment: Initialize BoardArray.
Make sure to drag it into the On Start of layout.
Now right click again add select Add global variable – name the variable row (type: Numeric, Initial value:0)
Create another global variable name it col (type: Numeric, Initial value: 0)
Drag both variable from the upper position to inside the On start of layout.
Notice that their naming will change from Global to Locale and this is what we want.
Your screen should look like this:
We will create a loop that goes from 0 to 14 – get the values row and column using the above formulas – assign the index value to the (col,row) position in the array.
Manually set -1 for the position (3,3).
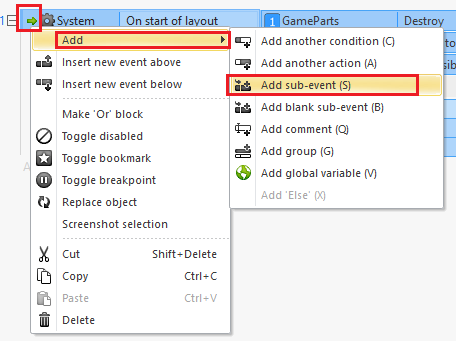
Right click on the green flash next to the On start of layout line → select add → then select Add sub-event (S).
This will ensure that the for loop is added as a sub-event inside of On start of Layout and not as separate Event outside.
Note that you can create the loop as a separate event and then simply drag it inside the On start of layout.
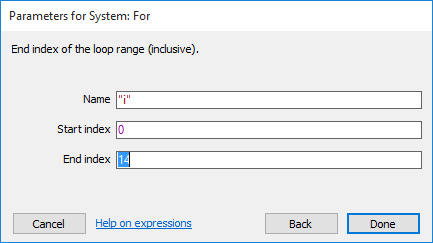
Select the For event – Click Next.
Specify “i” for the Name.
Set Start index to 0.
Set End index to 14 → then click Done.
For each index i in the loop we want to calculate the values of col and row and assign the value of i to that (col,row) position.
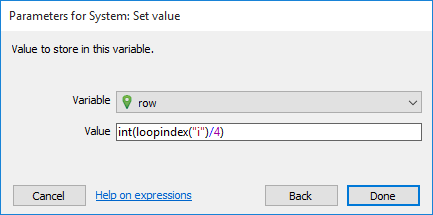
Click on Add action → Select System → Click Next → Then select Set value.
Select the variable row and specify its value: int(loopindex(“i”)/4)
Click on Add action → Select System → Click Next → Then select Set value
Select the variable col and specify its value: loopindex(“i”) % 4
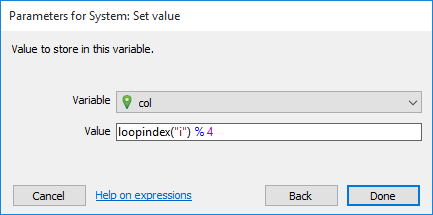
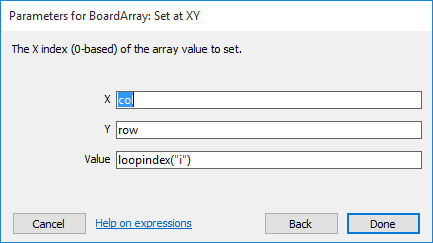
Click Add Action → Select BoardArray → Click Next → Then Select Set at XY
Specify for X: col
Specify for Y: row
Specify for value: loopindex(“i”)
Click Done
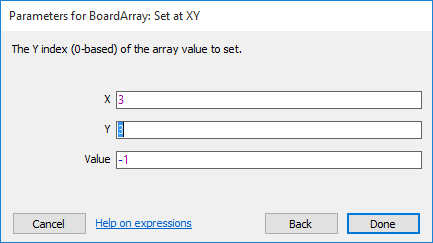
We assign the empty space (3,3) in the array the value -1.
Right click on the green flash next to the On start of layout line again and → select add → then select Add Blank sub-event (S).
Then click on the Add action → Select BoardArray → Set X and Y to 3 and value to -1.
Note: Make sure that this last action is added after and outside the loop.
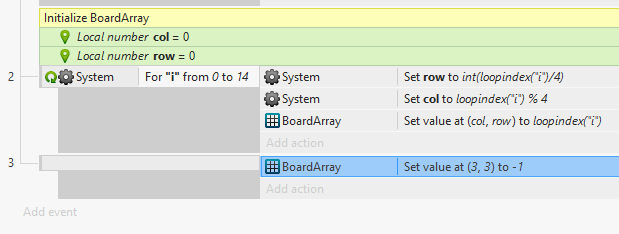
The compete Initialize BoardArray section should look like this:
c- Display the pieces
We saw in the previous section a way to traverse a 2-dimensional array where we used a single loop to go from 0 to 14 and used 2 variables row and col to calculate the index positions in the array.
Here we are going to use another technique – nested loops.
The idea is start from row 0 and visit every column in it – based on the value in the (i,j) location create the GameParts object and set the animation frame to the value found in (i,j).
Displaying the objects this way – without the shuffling – should show us the game board sorted.
This section should be a sub-event of the On start of layout – so right click on the green arrow and select Add then select Add sub-event.
Select System and Click Next. Select For and click next – Specify for Name “i” – this is going to represent the column index – and specify for Start index 0 and End index 3 – Click Done.
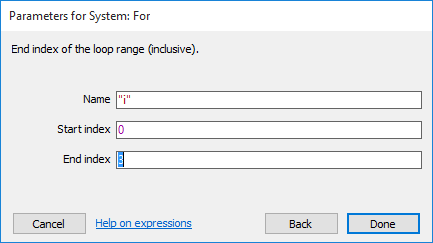
Right click on the green circle select Add – then select Add Sub-Event. Click on system then Next – and select the For.

Specify for Name: j, for Start index: 0 and for End index 3.
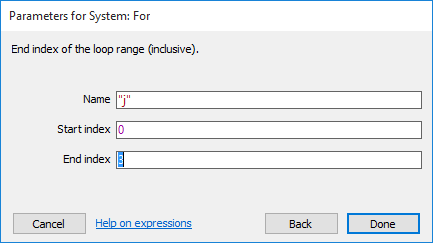
Click Done.
Now we have to add a condition – in this condition we will say if the (i,j) value is -1 (the empty cell) don’t create a piece – otherwise create the piece.
Right click on the green circle next to the j loop line and select Add → then Add another condition.
Select System → Click Next → Select Compare Two Values.
In the First value: BoardArray.At(loopindex(“i”),loopindex(“j”))=-1
Comparison: Equals to
Second Value: 0
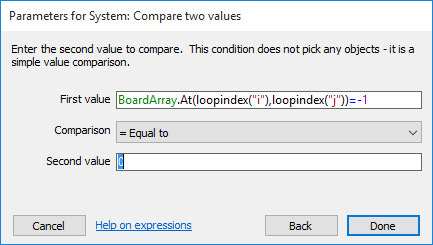
Interpretation: Check the value of BoardArray(i,j) is it equal to -1 if false (= equal to 0) don’t do anything otherwise Execute the actions on the right.
Let’s say the BoardArray(i,j) contains the value 3.
So the answer to the question is BoardArray(i,j) equal to -1 is False → 0
The second part becomes 0 = 0 → true so the statements on the right will be executed.
Another example – BoardArray(i,j) contains -1. The empty place.
So the answer to the question BoardArray(i,j) equals to -1 is True → 1
The second part becomes 1=0 → false so the statements on the right will not be executed.
Click on Add action – on the level of the For “j” level..
Select System → then Create Object.
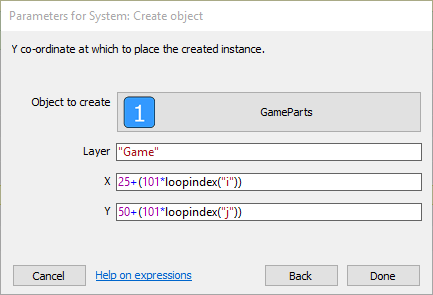
For the Object to create: Select the GameParts
Specify “Game” for Layer
The X value: 25 + (101*loopindex(“i”))
The Y value: 50 + (101*loopindex(“j”))
Click Done
Click Add action again.
Select GameParts and specify as action Stop Animation.
Click Add action again → Select GameParts → Select Set Frame and specify as Frame number the content of the BoardArray At (i,j).
Click done
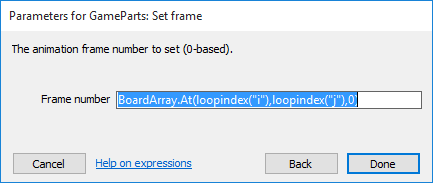
Now we are ready to run the Game – Click on the Run Layout Button.
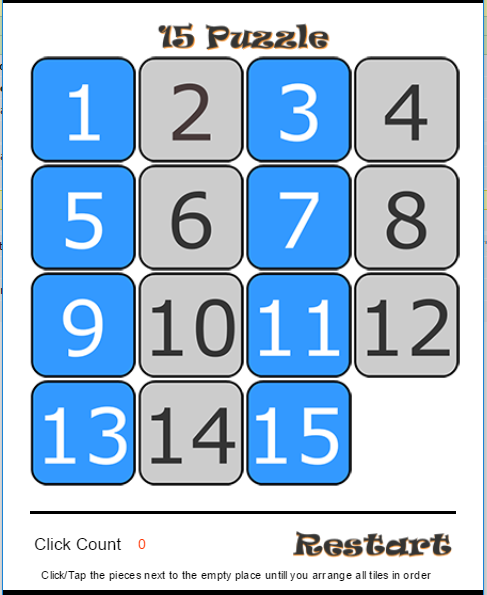
This is exactly what we should have – since we did not shuffle the pieces yet.
d- Shuffle the array
Now we are going write the section where we shuffle the pieces (It should be placed before the Display Pieces section when we are done).
For this section we need 3 global variables:
Empty_x, Empty_y – to keep track of the empty position in the BoardArray – Initially both should be assigned 3.
Random_Steps: Variable to keep track of how many shuffle steps to perform. Initially we can have this variable 3 for testing purposes – However for the actual game a minimum value of 100 is recommended.
Right Click anywhere in the gray section in the Events tab and add the 3 Global variables.
Your screen should look like this.

For each shuffle move we are going to select a random number from 0 to 3 where:
0 – means move the piece from the left to the empty place.
1 – means move the piece from the top to the empty place.
2 – means move the piece from the right to the empty place.
3 – means move the piece from the bottom to the empty place.
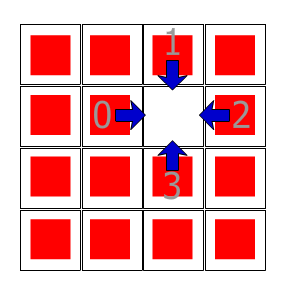
There are 4 special cases that we need to take into consideration to avoid problems.
In each case we will ignore and select the next random number if one of these numbers comes up.
Case of 0 and the empty space is in the first column – since we don’t have any pieces on the left side of the empty place it must be ignored.
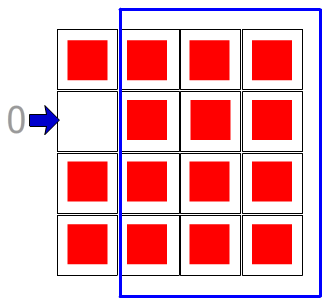
Case of 1 and the empty space is in the first row – since we don’t have any pieces on the top of the empty place it must be ignored.
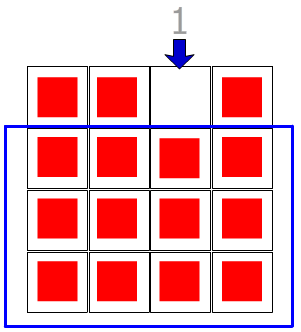
Case of 2 and the empty space is in the last column – since we don’t have any pieces on the right side of the empty place it must be ignored.
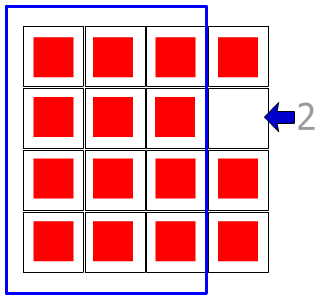
Case of 3 and the empty space is in the last row – since we don’t have any pieces on the bottom of the empty place it must be ignored.
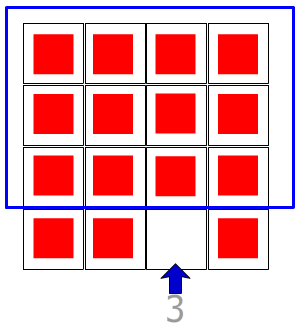
Reminder that the Shuffle section must be before the display pieces section however for convenience, we are going to place it at the end of the On Start of Layout section – We’ll just drag it to appropriate place later on.
Right click on the variable col or row and select Add another variable.
Name the variable pick (this will store the random number 0,1,2,3)
Similarly add another variable and name it rndCNT make sure that this one also is initialized to zero.
The rndCNT will start from zero and will be incremented each tie we shuffle a piece until it is equal to Random_Steps.
Right Click on the Start of Layout line and select Add → Add Sub-Events
Select System then select While
Right click on the System/While you just created and select Add another condition → Select System then Compare two value

Fill the first value rndCNT and the Second value Random_Steps and make sure to change the comparison to Less than.
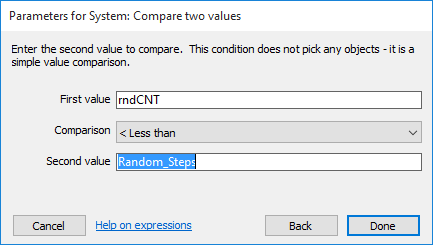
Add a comment name it Shuffle and drag it just before the While we just created – also drag the 2 variables we created pick and rndCNT to just after the shuffle comment and before the While – Our screen should look like this:

Click on the Add action next to the While line – Select System → select Set Value.
Specify the variable pick and select the value: floor(random(4))
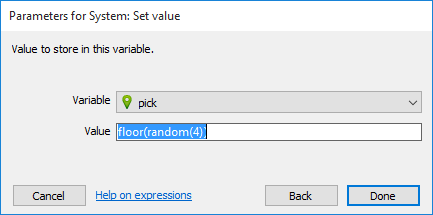
Each time the while repeats the pick will be assigned a random number between 0 and 3.
Note that the random may return any number between 0 and 3.999…. taking the floor of the number ensures that we only have value 0,1,2,3.
Now let’s add the 4 conditions – right click on the While block and Select Add then Add blank sub-event(B) – your screen should look like this:

Double click on the newly created block – select System → then select Compare variables → Select the pick variable and specify equal to 0.
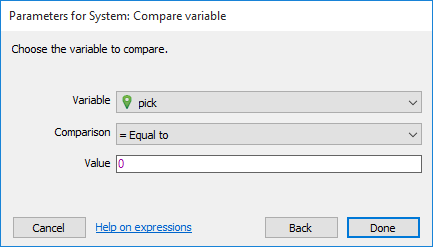
Right click on the pick=0 line → select Add then select Add another Condition → Select Compare variable
This time we want to add empty_x>0 which is the highlighted area in figure 37
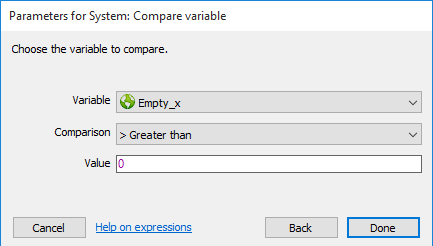
Right click on the block of the pick=0 → select Add then select Add ‘Else’ (X) to add and else block.
Right click on the else block and select Add another condition → select system then select Compare variables.
Specify pick = 1
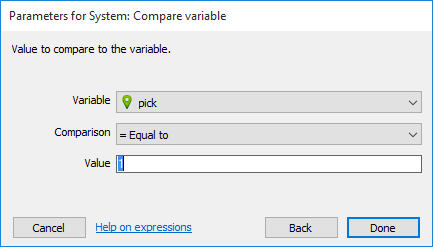
Right click again on the else block and select Add another condition then System and Compare variables.
Select variable Empty_y and specify greater than zero (highlighted area in figure 38)
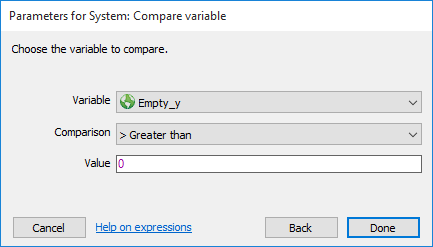
Right click on the last Else block and select Add then Add ‘Else’ (X)
This will create another else block. We want to add 2 conditions to this block as well.
Pick =2 and Empty_x less than 3 (highlighted area in figure 39)
We should have the following:

On more block to add – Right click on the last Else block and select Add then Add ‘Else’ (X)
Specify 2 condition for this block as well.
Pick = 3 and Empty_y<3 (highlighted area in figure 40)
With the last additions the complete While block should look like this:
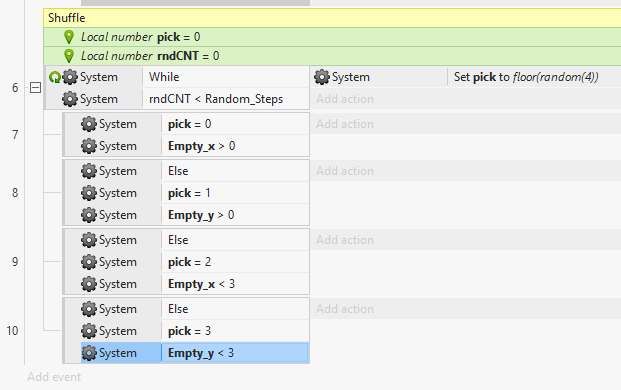
What are the actions we need to perform in the case of each pick?
In all of the below discussions:
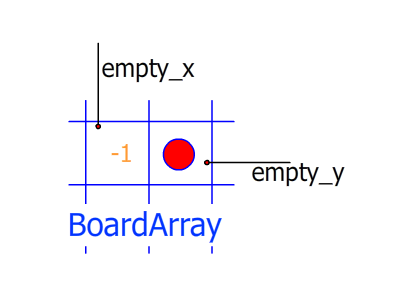
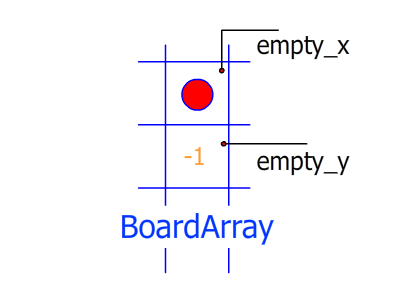
- The red circle represents the value found in the BoardArray adjacent of the empty space.
- The -1 represents the empty space in the BoardArray.
- The 2 variables empty_x and empty_y point to the empty location in the BoardArray.
Case where pick=0
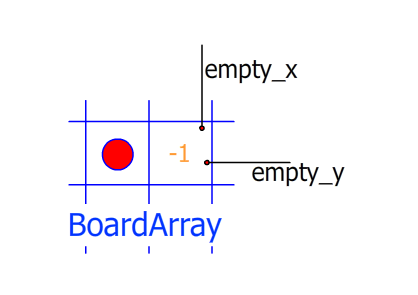
The idea is to move the red circle to the place of the -1 and the -1 to the place of the red circle and update the empty_x and empty_y variables to point to the new empty location.
Note that most of the manipulation is in the BoardArray.
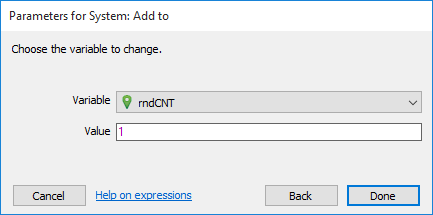
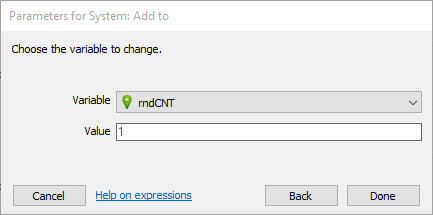
The first thing we want to do is to increase the rndCNT variable by 1.
Click on the Add action next to the pick=0 group.
Select System then Add to – Specify rndCNT for variable and select 1 for value – Then select Done.
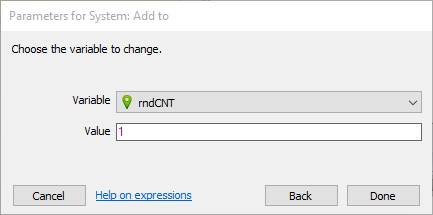
The first step is to move the value from the left of the empty space to the empty space – indicated by the green flash in the picture.
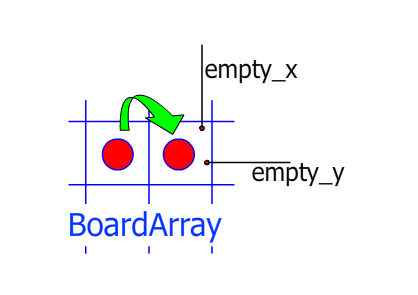
Click on Add action – Select BoardArray.
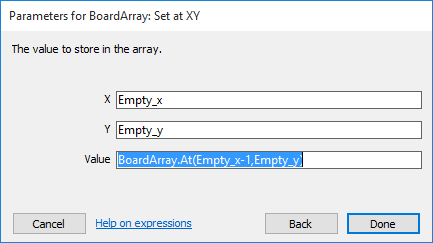
Select Set at XY
Specify for X: Empty_x
Specify for Y: Empty_y
Specify for value: The value from the left of the empty place which is Empty_x-1
The value from the Empty_x-1 can be obtained by:
BoardArray.At(Empty_x-1, Empty_y) as indicated by the below figure – Click Done
We initialize the old position in the BoardArray to -1.
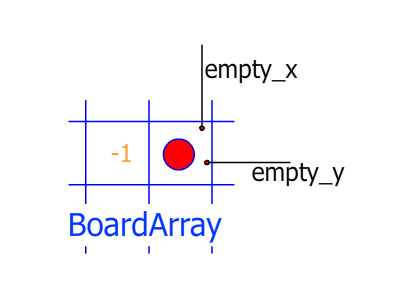
Click Add action – Select BoardArray and select again Set at XY.
Specify for X: Empty_x -1
Specify for Y: Empty_y
Specify for Value: -1
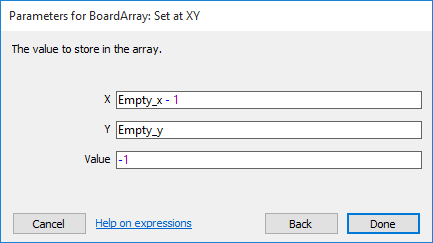
Click Done
One more thing left to do is to update the Empty_x variable to point to the empty cell in BoardArray. To do this we need to subtract 1 from the value of Empty_x.
Click Add action – Specify System – Select Add To.
For the variable specify: Empty_x
For the value specify: -1
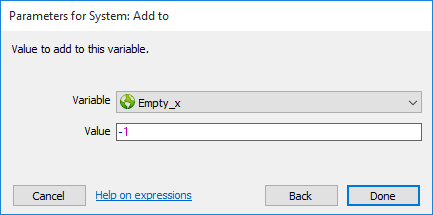
Click Done.
The complete section for pick=0 should look like this:

It would be a good exercise to try writing the code for cases 1, 2 and 3 then check your work here. Or continue reading.
Case where pick=1
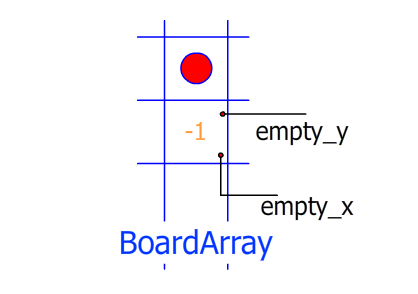
Again the idea is to move the red circle to the place of the -1 and the -1 to the place of the red circle and update the empty_x and empty_y variables to point to the new empty location.
Again most of the manipulation is in the BoardArray.
The first thing we want to do is to increase the rndCNT variable by 1.
Click on the Add action next to the pick=1 group.
Select System then Add to → Specify rndCNT for variable and select 1 for value → Then select Done.
The first step is to move the value from the top of the empty space to the empty space – indicated by the green flash in the picture.
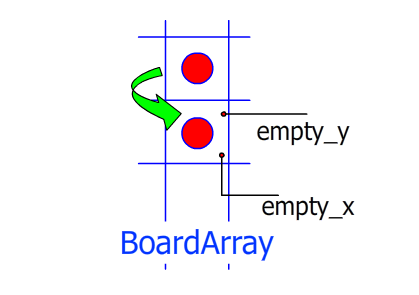
Click on Add action – Select BoardArray.
Select Set at XY
Specify for X: Empty_x
Specify for Y: Empty_y
Specify for value: The value from the top of the empty place which is Empty_y-1
The value from the Empty_y-1 can be obtained by:
BoardArray.At(Empty_x, Empty_y-1) as indicated by the below figure – Click Done
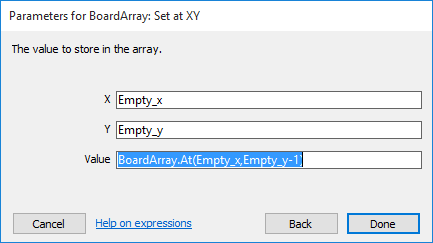
We initialize the old position in the BoardArray to -1.
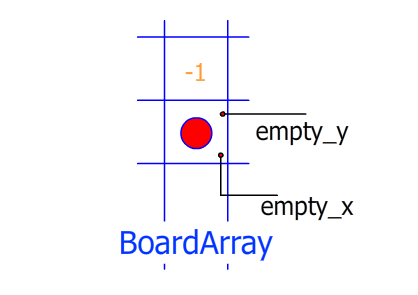
Click Add action – Select BoardArray and select again Set at XY.
Specify for X: Empty_x
Specify for Y: Empty_y-1
Specify for Value: -1
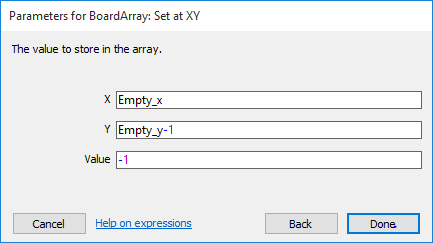
Click Done
One more thing left to do is to update the Empty_y variable to point to the empty cell in BoardArray. To do this we need to subtract 1 from the value of Empty_y.
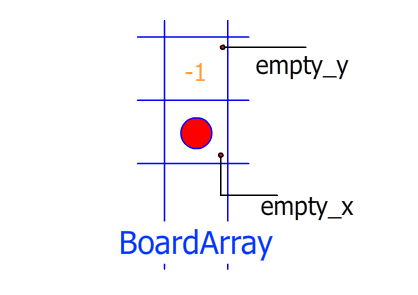
Click Add action – Specify System – Select Add To.
For the variable specify: Empty_y
For the value specify: -1
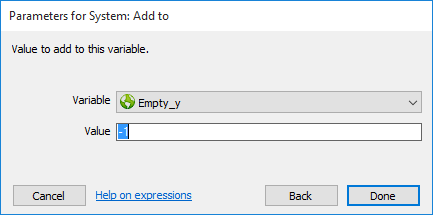
Click Done.
The complete section for pick=1 should look like this:

Case where pick=2
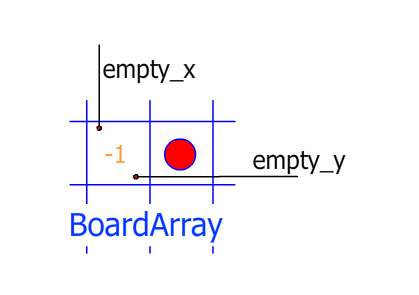
The idea is to move the red circle to the place of the -1 and the -1 to the place of the red circle and update the empty_x and empty_y variables to point to the new empty location.
Note that most of the manipulation is in the BoardArray.
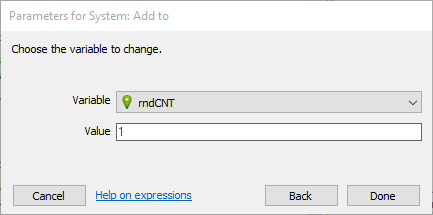
The first thing we want to do is to increase the rndCNT variable by 1.
Click on the Add action next to the pick=2 group.
Select System then Add to – Specify rndCNT for variable and select 1 for value – Then select Done.
The first step is to move the value from the right of the empty space to the empty space – indicated by the green flash in the picture.
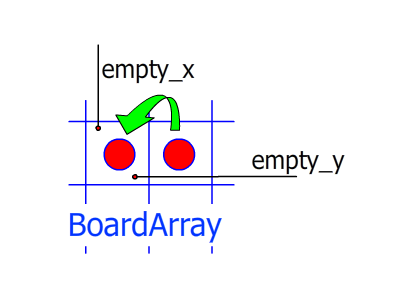
Click on Add action – Select BoardArray.
Select Set at XY
Specify for X: Empty_x
Specify for Y: Empty_y
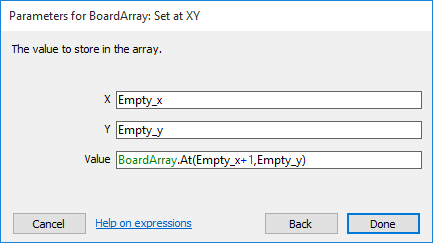
Specify for value: The value from the left of the empty place which is Empty_x+1
The value from the Empty_x-1 can be obtained by:
BoardArray.At(Empty_x+1, Empty_y) as indicated by the below figure – Click Done
We initialize the old position in the BoardArray to -1.
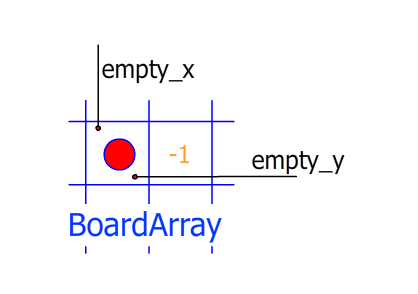
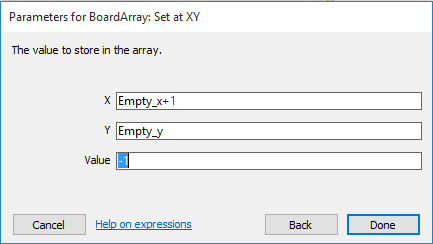
Click Add action – Select BoardArray and select again Set at XY.
Specify for X: Empty_x +1
Specify for Y: Empty_y
Specify for Value: -1
Click Done
One more thing left to do is to update the Empty_x variable to point to the empty cell in BoardArray. To do this we need to add 1 from the value of Empty_x.
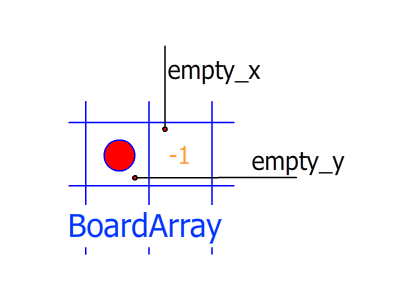
Click Add action – Specify System – Select Add To.
For the variable specify: Empty_x
For the value specify: 1
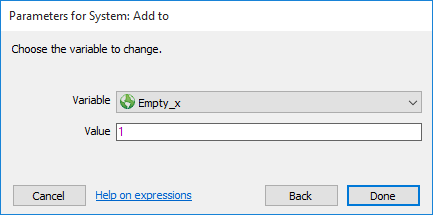
Click Done.
The complete section for the pick=2 should look like this:

Case where pick=3
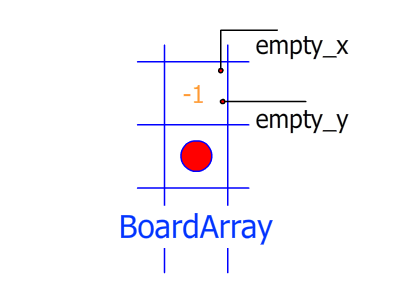
Again the idea is to move the red circle to the place of the -1 and the -1 to the place of the red circle and update the empty_x and empty_y variables to point to the new empty location.
Most of the manipulation is in the BoardArray.
The first thing we want to do is to increase the rndCNT variable by 1.
Click on the Add action next to the pick=3 group.
Select System then Add to – Specify rndCNT for variable and select 1 for value – Then select Done.
The first step is to move the value from the top of the empty space to the empty space – indicated by the green flash in the picture.
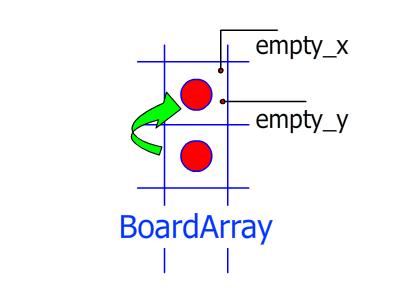
Click on Add action – Select BoardArray.
Select Set at XY
Specify for X: Empty_x
Specify for Y: Empty_y
Specify for value: The value from the top of the Empty place which is Empty_y+1
The value from the Empty_y+1 can be obtained by:
BoardArray.At(Empty_x, Empty_y+1) as indicated by the below figure – Click Done
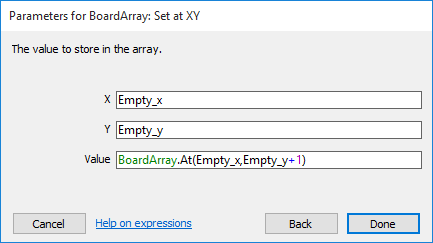
We initialize the old position in the BoardArray to -1.
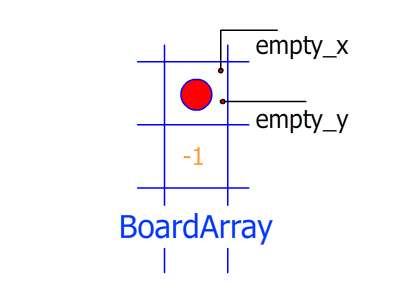
Click Add action – Select BoardArray and select again Set at XY.
Specify for X: Empty_x
Specify for Y: Empty_y+1
Specify for Value: -1
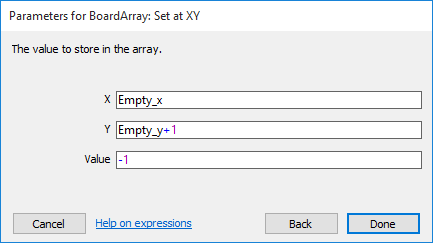
Click Done
One more thing left to do is to update the Empty_y variable to point to the empty cell in BoardArray. To do this we need to add 1 to the value of Empty_y.
Click Add action – Specify System – Select Add To.
For the variable specify: Empty_y
For the value specify: 1
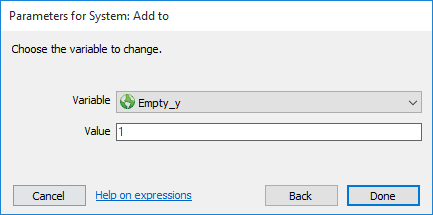
Click Done.
We are done with the coding of the shuffle part – One more thing left to do – we need to move the complete Shuffle section before the Display Pieces section.
Select the Shuffle comment, the 2 local variables, and the while statement (highlighted in blue in the below figure) and drag them before the Display Pieces section.
Your screen should look like the below:
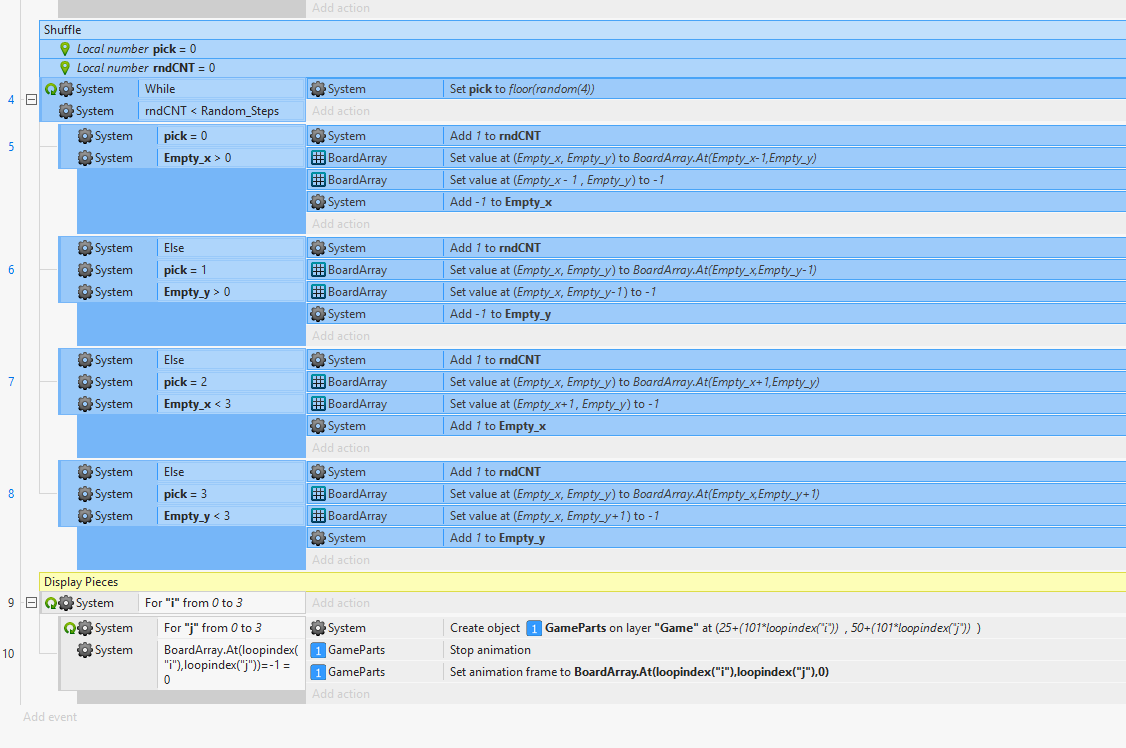
You can run to check your work – Note that the Random_Steps is set to 3 so the different results you get must be solved with at max 3 steps.
Some sample results might look like these – note that your results might be slightly different.

1 – Allowing the user to play the game
a- Allow the user to move the piece to the empty place if the piece clicked is horizontally or vertically next to the empty place.
First of all, we need to determine which piece was clicked – This is done by getting the X and Y position of the piece clicked.
Remember that:
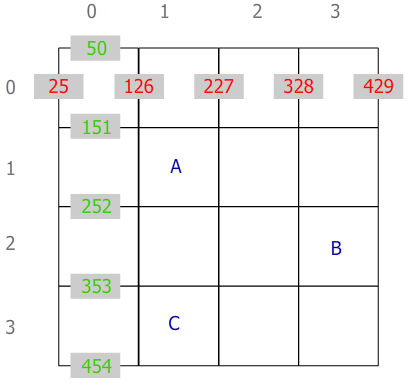
All pieces were placed starting at position (x,y)=(25,50) on the page and the distance between pieces is 101px.
In the figure below the x values are in Red and the y values of the pieces are in green. Also remember that the Origin cross of all game pieces is set at the upper left corner.
The formula used for the Hit_x and Hit_y variables which will hold the position of the piece clicked is a s follows:
Hit_x = floor((GameParts.X-25)/101)
Hit_y = floor((GameParts.Y-50)/101)
Some examples:
If we click the piece in position A in the above figure the values returned will be (x,y)=(126,151)
Hit_x = floor( (126-25) / 101) = floor( 101/101) = floor(1) = 1
Hit_y = floor( (151-50) / 101) = floor(101/101) = floor(1)=1
Clicking the piece at position B will return (x,y)=(328,252)
Hit_x = floor( (328-25) / 101) = floor( 303/101) = floor(3) = 3
Hit_y = floor( (252-50) / 101) = floor(202/101) = floor(2)=2
Last example – Clicking the piece at position C will return (x,y)=(126,353)
Hit_x = floor( (126-25) / 101) = floor( 101/101) = floor(1) = 1
Hit_y = floor( (353-50) / 101) = floor(303/101) = floor(3)=3
We need to create event of the clicking the pieces – both with a mouse and touching the piece on a touch screen.
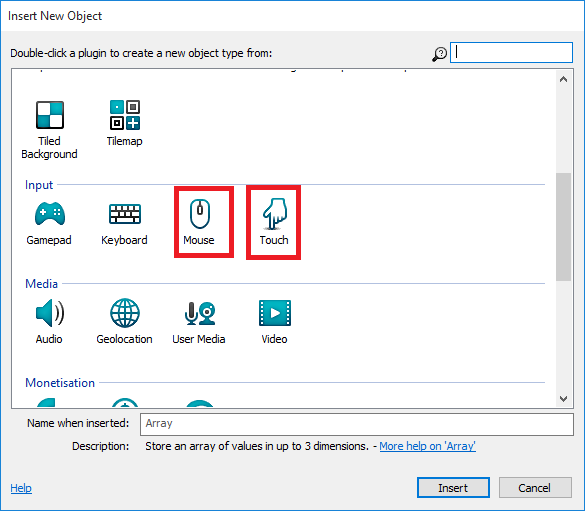
We need to add 2 objects – The mouse and the touch.
Right click anyplace empty in the Object Pane and select Insert New Object

In the input section select the mouse then click insert.
Repeat the same actions to add the Touch.
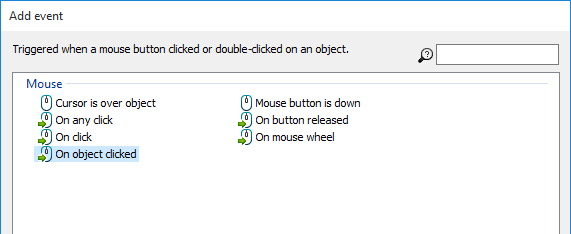
Click on the Add event → select Mouse.
Then select On object clicked from the list → then select next.
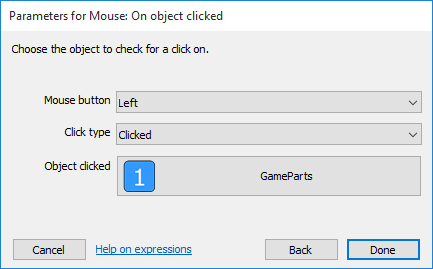
Make sure that you specify the GameParts for Object clicked → click done.
You added event should look like this:

Right click below the Mouse icon and select Add another condition.
Select the Touch object → then select the Is touching object in the touch group.
Specify the GameParts for Object.
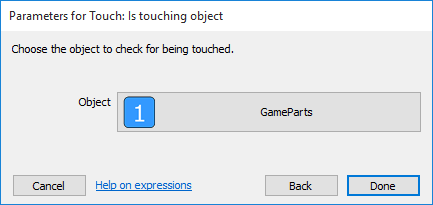
The Event Should look like this:

Right click below the green arrow and select from the menu: Make ‘Or’ Block.
The new event block should look now like this:

Explanation: what we are saying here is that if someone clicks with the mouse on a GameParts object or touches the GameParts object we want to execute a set of actions.
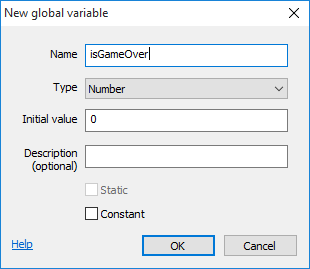
We need to create a global variable called: isGameOver – if its value is 1 it will indicate that game is over and the puzzle was solved and all movements to the pieces must be disabled – If the value is 0, we can still move the pieces and it is not game over.
Right click anyplace below the Add event empty area and specify Add Global Variable.
Name the variable: isGameOver.
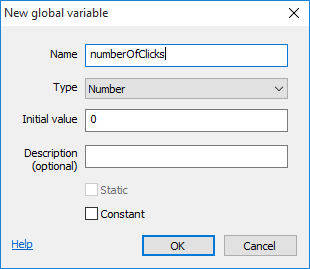
We need to add another global variable (called numberOfClicks) which we will use to count how many times pieces were clicked.
Right click in an empty area and specify – Add global variable.
We need to create 2 local variables to hold the x and y values of the GameParts clicked.
We will name them Hit_x and Hit_y.
Right click on the mouse and touch block and select Add then select Add blank sub-event.
Right click on the blank sub event created – Select add then select Add local variable.
Name the variable: Hit_x
Repeat the same for the other variable Hit_y.
Your screen should look something like this.
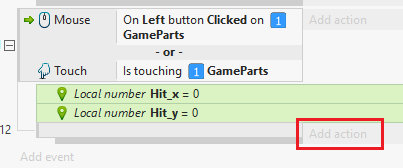
Once done click on the add action to initialize the value of the Hit_x and Hit_y.
Click Add action àselect System àselect Set Value in the Global & Local variables section.
For Variable specify Hit_x and for value specify: floor((GameParts.X-25)/101)
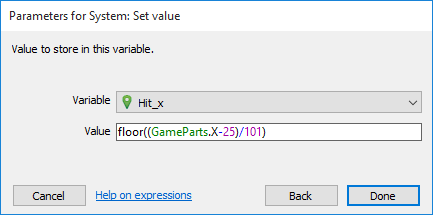
Repeat the operation for Hit_y and specify a value of: floor((GameParts.Y-50)/101)
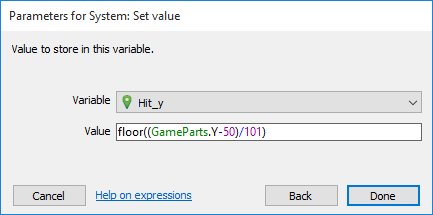
The completed section should look like this:

Right click on the Mouse & Touch event and select Addàselect Add blank sub-event.
Right click on the blank sub-event created and select Addàselect Add another condition.
Select System àCompare Variables.
Specify isGameOver as variable.
Specify Not equal to as comparison.
Specify 1 as value.
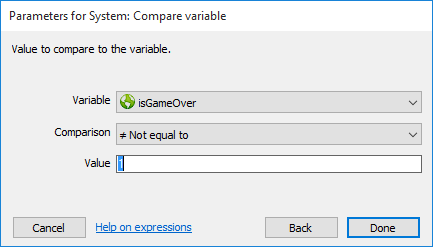
Let’s recap – we did the following steps so far.
- Determined if the user clicked or touched a GameParts(a piece).
- We determined the (x,y) position of the piece clicked (Hit_x,Hit_y)
- If the game is not over (isGameOver not equal to 1) we are going to move the piece (GameParts clicked).
The fourth step is to determine if the piece clicked is allowed to move. Only pieces adjacent (left, top, right, bottom) to the empty place are allowed to move.
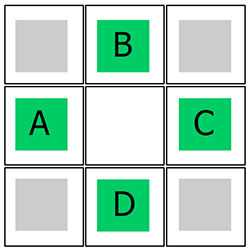
If in the above figure the empty place is at the center (Empty_x, Empty_y) only A, B, C and D should be allowed to move and occupy the empty place.
Remember in the below discussion Empty_x and Empty_y are the (x,y) of the empty position.
If A was clicked – Hit_x and Hit_y represent the position clicked. Since the empty place is on the same row Hit_y is equal to Empty_y and Hit_x +1 is equal to Empty_x.
Basically what we are saying that if Hit_x+1=Empty_x and Hit_y=Empty_y are both True then A was clicked.
| A | Hit_x+1=Empty_x | The piece to the left of the empty place | Hit_y=Empty_y | Since same row the Hit and the Empty Ys should be equal |
| B | Hit_x=Empty_x | Since same column the Hit and Empty Xs should be equal. |
Hit_y+1=Empty_y | The piece to the top of the empty place |
| C | Hit_x-1=Empty_x | The piece to the right of the empty place | Hit_y=Empty_y | Since same row the Hit and the Empty Ys should be equal |
| D | Hit_x=Empty_x | Since same column the Hit and Empty Xs should be equal. |
Hit_y-1=Empty_y | The piece to the bottom of the empty place |
Right click on the System isGameOver ≠ 1 line and select Add blank sub-event.
Right click on the newly added sub event and click Add another condition.
Select System → Compare two values.
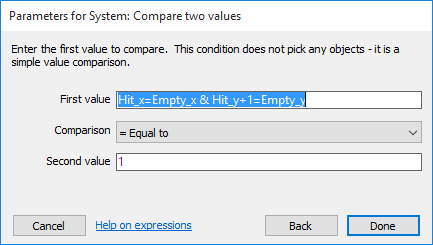
For A specify the following:
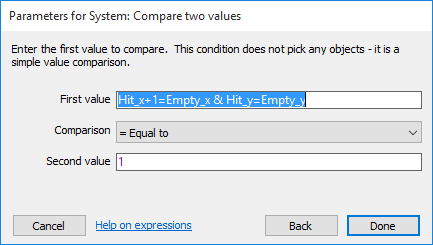
Right click on the newly added condition and select Add another condition and specify for B case the following:
Repeat the same for C and D
For C:

For D:
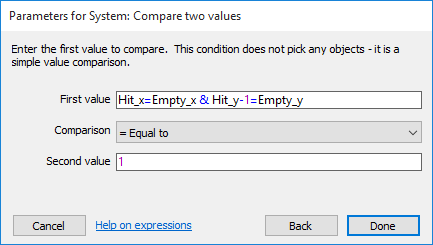
Our screen should look like this:

One more thing left to do – Since any one of these conditions is true we should be able to move the pieces right click on the conditions block and select Make ‘or’ block and our screen should look like this.
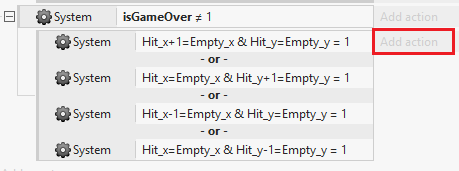
Click on the Add action indicated by the red rectangle in the above figure – be careful NOT to click the one above it.
Remember: (Hit_x, Hit_y) is the piece that was clicked and (Empty_x, Empty_y) represents the empty place.
We need to do the following steps:
| 1) Set the position of the Empty to the Hit values (both x and y) in the BoardArray | |
| Click on Add action → select BoardArray → select Set at XY.Specify Empty_x for the X value and Empty_y for the Y value. And specify the value the content of the BoardArray at position (Hit_x,Hit_y)  |
|
| 2) Adjust in the BoardArray the (Hit_x,Hit_y) position be empty by assigning it a -1 value | |
| Click Add action. Specify BoardArray → select Set at XY. Specify for X value Hit_x. Specify for Y Value Hit_y. And for the value specify -1. 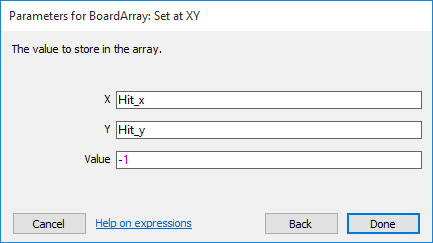 |
|
| 3) Next we need to move the clicked piece to the position of the Empty_x,Empty_y | |
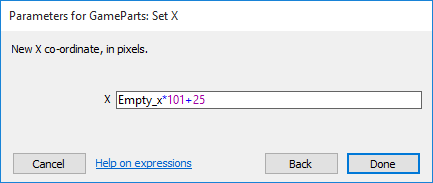
| The formula for the X of the GameParts piece clicked is: Empty_x*101+25.The formula for the Y of the Gameparts piece clicked is: Empty_y*101+50.
Click Add action → GameParts → Set X
Click Add Action → GameParts → Set Y
|
|
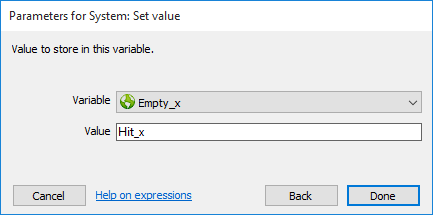
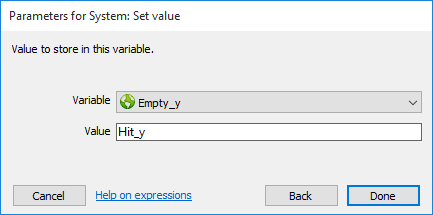
| 4) We need to adjust the values of the Empty_x and Empty_y which they should be equal to the (x,y) of the pieces hit in other words (Hit_x, Hit_y). | |
| Click Add action again select System → Set value
|
|
| 5) We add 1 to the numberOfClicks and display the value | |
| Click Add action → System → Add to Specify numberOfClicks for the variable and 1 for the value. 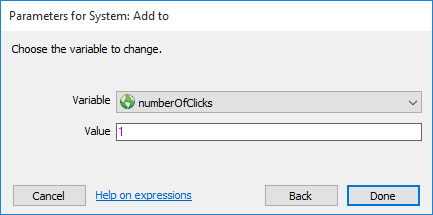 Select Add action again and select the txtCount object → Set text. Select Add action again and select the txtCount object → Set text.And specify numberOfClicks as its text value. 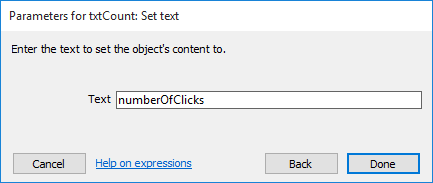 |
|
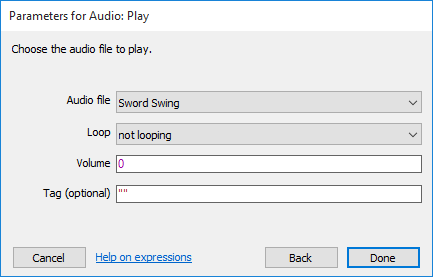
| 6) Play the ‘Sword Swing’ sound effect. | |
Select Add action and select Audio → Play
|
|
| 7) Our last step is check if game is over – This will be accomplished using a function (called CheckGameOver) discussed in the next section. | |
However, for now you can test the game and you should be able to move the pieces. But since we did not write the game over section nothing will happen even if you put all the pieces in order.
Remember the Random_Steps is set to 3 so you should be able to adjust and order everything with only 3 steps.
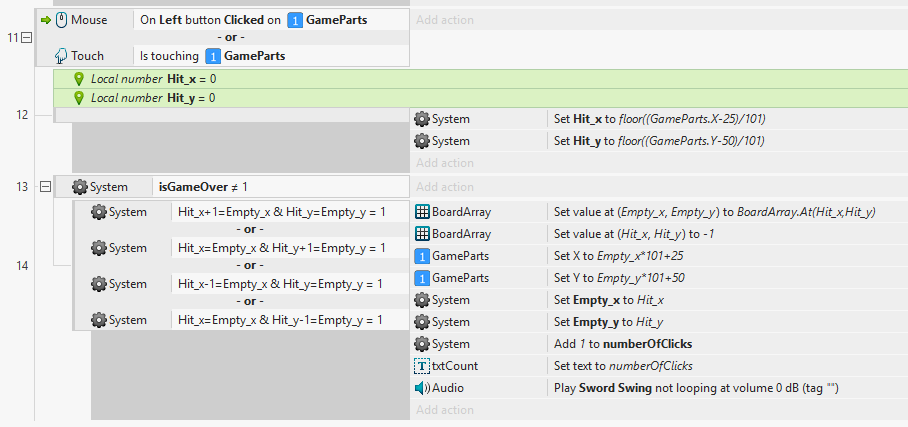
The complete section for now should look like this:
To be able to use a function we must add the function to the Objects panel.
Right click in the Object pan and select Insert New Object.
Select the Function from the General Group. Visually you will not see any change in the Objects pan. However, when you click on the Add event you will see the function icon in the list.
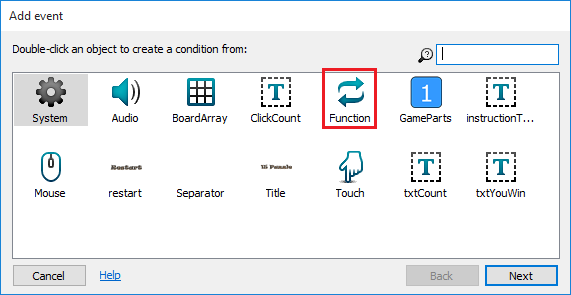
Select Function and click Next → select On function and click next.
Specify for the Name: “CheckGameOver” – make sure that it is surrounded by double quotes.
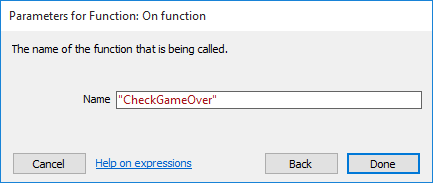
The purpose of the CheckGameOver is to determine if the puzzle was solved, set isGameOver variable to true (=1) and display the You win!! message.
Basically the game is over if the values in the BoardArray are equal to the values shown in the figure below:

Any other combination means that it is not game over.
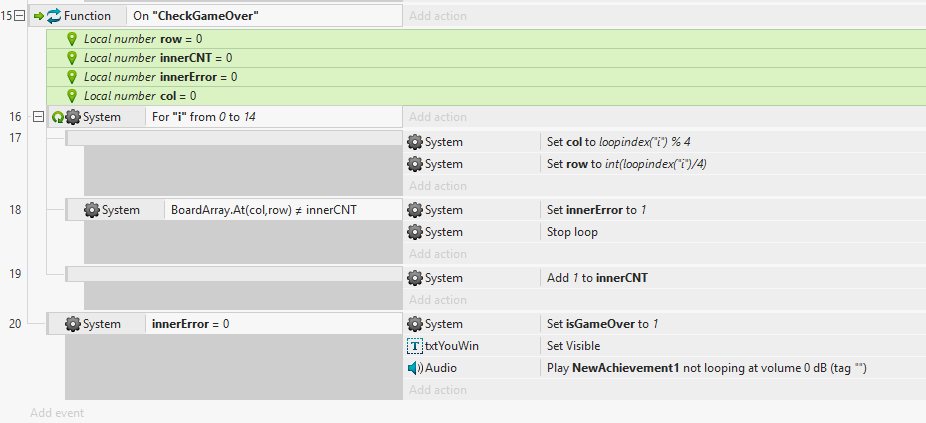
We already know how to traverse the complete array using a For loop (0 to 14) and col and row variables.
We create a numeric variable innerCNT(initial value zero) and for each step we compare its value to the value found in the BoardArray at position (col,row) then we increase the value of innerCNT.
If the innerCNT value does not match the BoardArray value at position (col,row) then it means that it is not game over. If one entry does not match it means it is still not game over – we don’t need to continue the loop.
Right click on the line of the Function – just below the flash line – click Add → Add blank sub-event.
We need to add 4 local variables all initialized to zero.
Col, row variables to keep track of the column and row in the loop.
innerCNT variable to compare it to the value found in the BoradArray at position (col,row).
innerError variable which we will use to determine if a mismatched occurred in the comparisons in the above step. At the end of the loop (or exiting from it) innerError=0 means BoardArray sorted and innerError=1 means there was a problem in the order.
For each one of the variables right click on the recently added blank sub-event and click Add then click Add locale variable.
Once you add the 4 variables your screen should loop like this.

Right click and delete the empty event highlighted in blue in the above figure.
Then right click below the green flash of the function line and select Add then Add sub-event – select System – select For from the list.
Specify “i” for name.
Start index = 0 and End index=14.
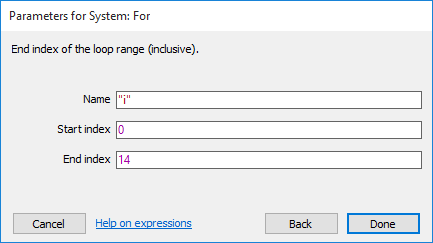
Right click on the For loop just created – select Add then select Add blank sub-event.
Click on the Add action of this newly created blank sub-event – select System → Set value – to specify the value of col variable.
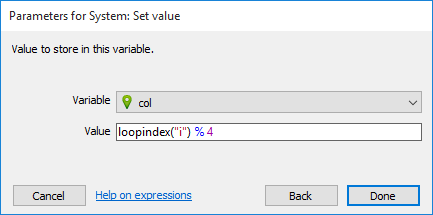
Similarly click on the Add action and add the value of row variable.
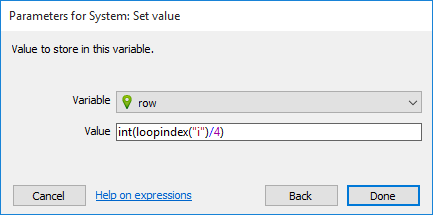
We will add now the condition to compare the innerCNT to the BoardArray at position (col,row).
Right click For loop line and select Add then Select Add sub-event.
Select System → Compare two values.
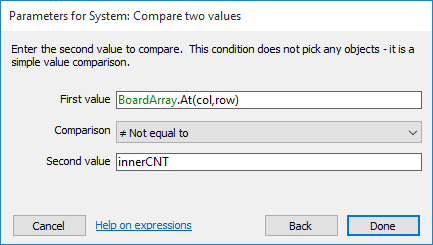
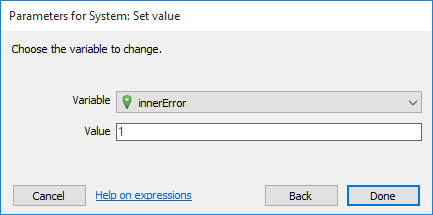
Click on Add action and set innerErrror to 1 (indicating that there was a mismatch).
And then we exit the loop (since once we get 1 mismatch it is pointless to continue)
Click Add action again → System → Stop loop.
At this point our For block should look like this:

We must add 1 to the innerCNT counter
Right click on the For line and select Add blank sub-event.
Then click on the Add action of this newly added event. Specify System → Add to
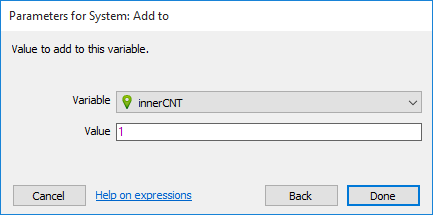
Once we get out of the loop – regardless if we complete the 0 to 14 loop or we exited due to mismatch – we need to check if innerError is zero or 1.
If 1 we ignore (not game over), if zero it is game over.
Make sure that you right click on the green arrow next to the Function line.
Click Add then click Add sub-event → System → select Compare variable.
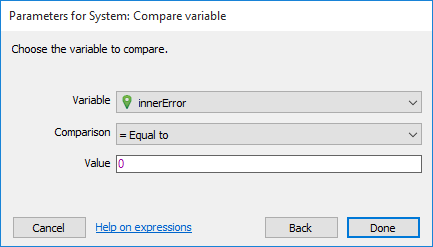
When innerError=0 we need 3 actions.
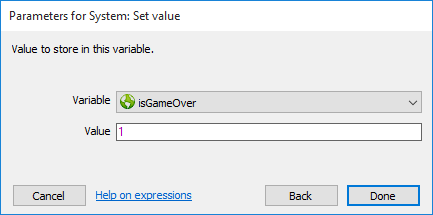
- Set the isGameOver=1 – to indicate that we have won.
- Click Add action → System → Set value
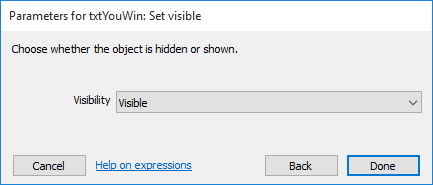
- txtYouWin text must be visible
Click Add action → select txtYouwin → Set visible.
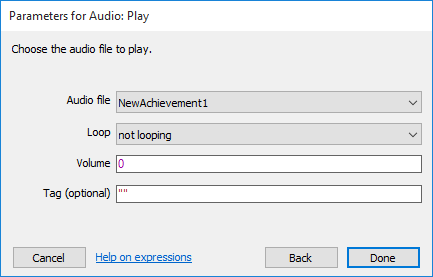
- Play the “newAchievement1” SoundClick Add action → select Audio → Play
Our complete function should look like this:
An alternative way of looking to the logic of the function is shown in this flowchart:
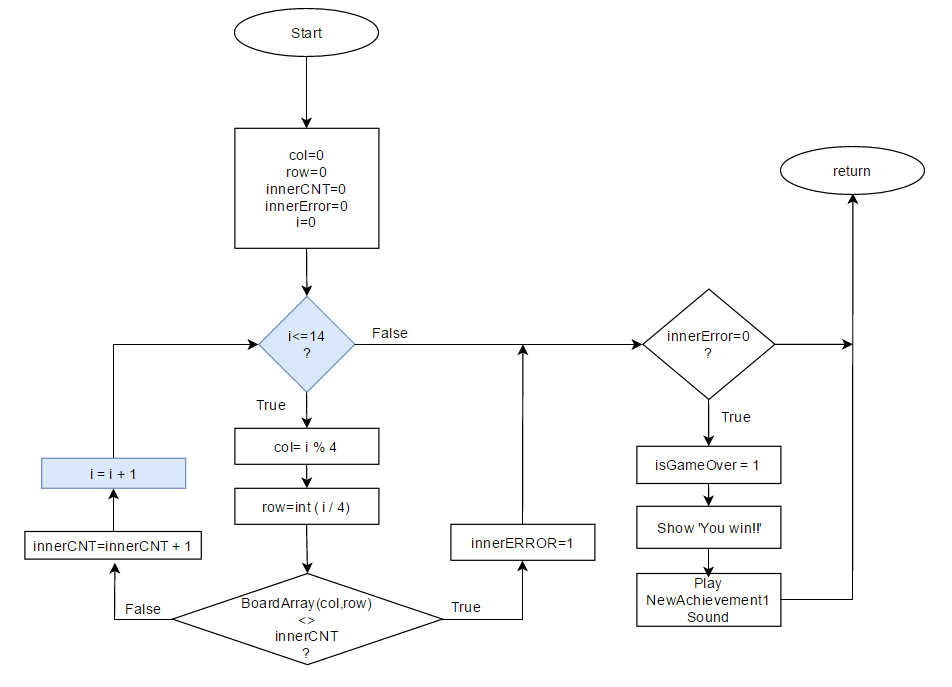
We have created our function but we need to call it.
It should be inserted as an action after the Play ‘Sword swing’ step (7).

Right click on Add action – select Function → Call function and specify CheckGameOver as name.
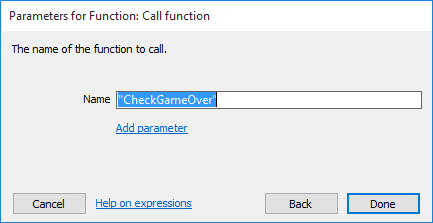
You can test at this point the game – when you arrange the pieces in order you should see the You win!!! text and will no longer be able to continue playing.
One more thing to do – We need to restart the game when someone clicks on the restart button either during the game or when they win.
Click on the Add event at the bottom of the page.
Select Mouse → On object clicked.
Mouse Button: Left
Click type: Clicked
Object clicked: Select the Restart image.
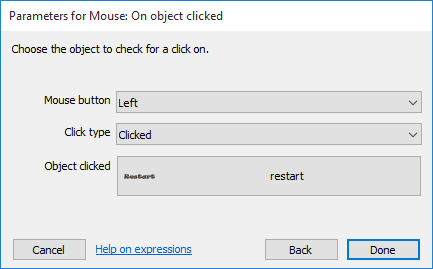
Right click on the on the green arrow and select Add → Add another condition à select the Touch object → Is touching object.
Specify the Restart image as the object.
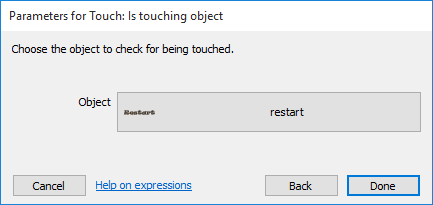
Right click on the Mouse and Touch block and select Make ‘Or’ block.
Your screen should look like this:

We want to add 4 actions when Restart button clicked or touched:
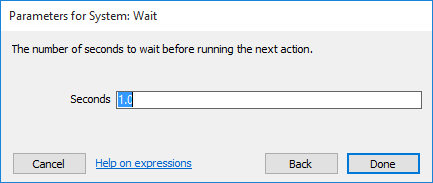
| 1- Wait 1 second. | |
| The purpose of waiting 1 second is to add a small delay before restarting the game again.Click Add action → select System → select Wait and specify 1.0 second.
|
|
| 2- Restart the layout. | |
| This will run the Restart layout Event that we wrote earlier.Click Add action → select System → select Restart layout. | |
| 3- Reset global variables to default. | |
| All Global variables are reset to their initial value.Click Add action → System → Reset global variables | |
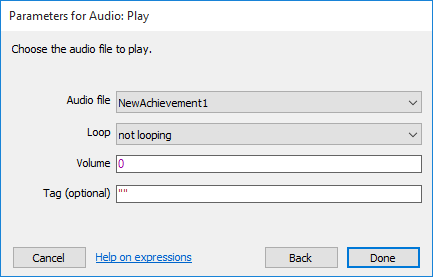
| 4- Play ‘NewAchivement1’ Audio. | |
| Click Add action → Audio → Play
|
|
We are done – test the application few times.
Once convinced that everything is working fine change the global variable Random_Steps from 3 to 100.
This concludes this tutorial – Remember practice makes perfect.


